
Paul Diamond Blow's Huggy Talk
Tips, tricks, and advice for graphic designers.
|
Photoshop Tip: Torn and Frayed Edges Effects
Want to Give Your Photo or Image a "Torn and Frayed Edges" Look? Here's How.
by Paul Ace Diamond "Huggy" Blow
Here are the steps for applying a "torn and frayed edges" look to your image with Photoshop:
Step 1: Once your photograph scan or image is open in Photoshop the first thing you need to do is to give the image a white margin around all the edges. To do this, go to "Image / canvas size" to open up the "canvas size" box. Add a quarter inch or so to both the width and height, make sure the "anchor" is the middle box (it is by default) so that the canvas size will expand from the center, and make the "canvas extension color" white. Click "okay" and your canvas will expand giving you a nice white border around the image.
Step 2: Next, use the rectangular marquee tool to select most of the actual image -- but be sure to leave a small portion of the edges of the actual image unselected. Then go to "Select / inverse" which will invert your selection so that the white border plus a small area around all the edges of the actual image are now selected. This selected area will get the Photoshop filter to give it a torn and frayed look.
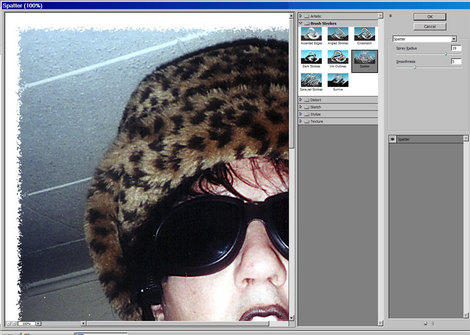
Step 3: Now it is time to apply the Photoshop filter that will give the edges a torn and frayed look. In Photoshop go to "Filter / brush strokes / spatter" ... This will open up the "brush strokes" window and you will see how the edges of your image are now given a torn and frayed, distressed effect. You can adjust the "stroke length" and "spray radius" to modify the torn and frayed effect. Once you have your torn and frayed edges effect about how you like it hit "okay" and the filter will be applied.
Step 4: Deselect the selection and you are done! Crop the image, if needed, and save the new file. (Tip: when saving the file do a "save as" and rename the file so as not to overwrite the original "unfrayed" image.)
There you go... the simplest and easiest way to give your photographs or images a "torn and frayed edges" effect with Photoshop. I have found that the "spatter" brush stoke effect works the best for creating torn and frayed edges, but the "sprayed strokes" brush stroke gives a similar effect. Feel free to experiment with the Photoshop filters and have fun with it!

More Paul Diamond Blow links: